BLACK LIVES MATTER — Please click on the link to find out what you can do to help end the oppression and killing of our fellow human beings.
This fourth video takes us on a little tour of the first bed-sized quilt I ever made — Caged Cacophony. It kind of all happened without any real plan at the beginning. In fact, I didn’t even plan on making a bed-sized quilt when I first started working on it. I’m a big fan of flying by the seat of my pants when it comes to designing and making quilts, and this quilt epitomizes that philosophy. Watch the video to learn more!
BLACK LIVES MATTER — Please click on the link to find out what you can do to help end the oppression and killing of our fellow human beings.
The third quilt in my virtual trunk show — Beyond the Machine — is very near and dear to my heart because it is the first quilt I designed myself. This quilt was made as part of the 25th anniversary celebration of the Brooklyn Quilters Guild. I wanted to make an industrial-looking version of the New York Beauty pattern, so I created a template that came together as cogwheels. Watch the video to find out more!
BLACK LIVES MATTER — Please click on the link to find out what you can do to help end the oppression and killing of our fellow human beings.
The Craftsy 2012 Block of the Month by Amy Gibson sampler quilt is the second quilt I ever made. I learned so many useful basic quilting skills and techniques, and I also used this as an opportunity to teach myself free-motion quilting thanks to Leah Day’s Free Motion Quilting a Sampler class, also on Craftsy.
Heads up! This is a very long video because I say a little bit about each block of the quilt. I’ve listed the blocks with their corresponding time stamp in the Description box below the YouTube video, so feel free to skip to whatever block you’re interested in.
BLACK LIVES MATTER — Please click on the link to find out what you can do to help end the oppression and killing of our fellow human beings.
Welcome to the first video of my virtual “trunk show”! Since I’m not planning on showing my quilts in person anytime soon, I decided it would be fun to take you on a chronological journey of my quilt making. In this video, I talk about the very first quilt I ever made thanks to a Craftsy class by Amy Gibson. If you want to make sure you don’t miss my following trunk show videos, be sure to click on that Subscribe button! Keep on making, everyone!
BLACK LIVES MATTER — Please click on the link to find out what you can do to help end the oppression and killing of our fellow human beings.
Since the COVID pandemic started in the US, there has been an uptick in sewing machine purchases so that people can sew face masks and keep themselves occupied while in lockdown. I thought it would be fun to just give a few very basic tips for people who are completely unfamiliar with sewing machines or haven’t yet gathered up the courage to use the one they bought at a garage sale 20 years ago.
I’d love to hear tips from all of you, so please share in the Comments section below. Please be sure to subscribe to my channel so you don’t miss any of my upcoming videos, and feel free to leave comments or questions below. Thanks for watching!
BLACK LIVES MATTER — Please click on the link to find out what you can do to help end the oppression and killing of our fellow human beings.
It’s time for my second unboxing video! I am very sad to say that Bluprint is no longer in operation. Back when it was Craftsy, I took the How to Quilt: Cozy Throw Quilt with Amy Gibson class and made my very first quilt. They had a big going-out-of-business sale at the end of May, so I ordered a bunch of yardage to have on hand for quilt top backgrounds and quilt backs as a birthday treat. Please be sure to subscribe to my channel so you don’t miss any of my upcoming videos, and feel free to leave comments or questions below. Thanks for watching!
In this episode of my YouTube series, I sit down once again with Shannon Reed and discuss creativity and her writing process. Be sure to check out Shannon’s new book that is being released very soon and is available for pre-order now! What are your thoughts about the creative process? Feel free to leave any comments or questions on my YouTube channel or contact me here on my website. And be sure to subscribe to my YouTube channel so you don’t miss out on any of my upcoming interviews and videos!
P.S. This video was recorded almost a year before COVID-19 caused the worldwide lockdowns. Hence our non-social distancing.
Please click on the links below to learn how you can side with your fellow human beings who are being oppressed and killed by the white supremacy that is woven throughout the fabric of every aspect of our society. It is especially important that white people accept that racism exists on an interpersonal level, an institutional level, and a structural level throughout our country and, once accepted, we do what we can to combat it.
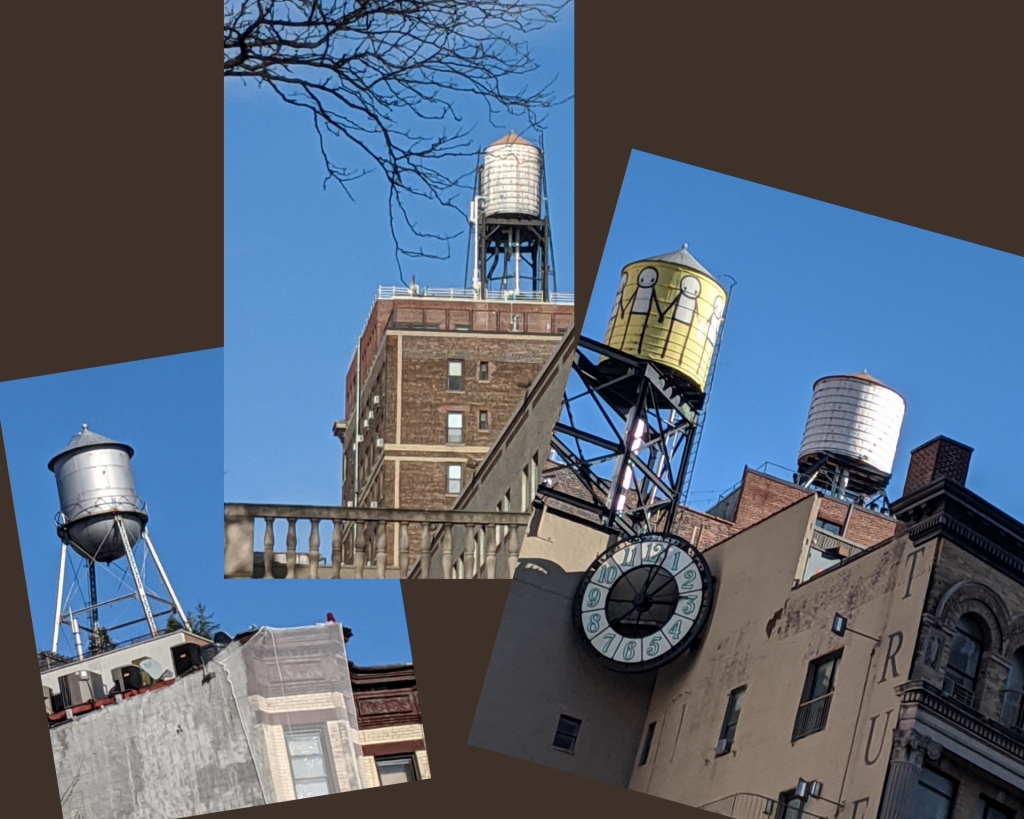
This quilt design was inspired by all of the rooftop water towers you’ll see as you perambulate around New York City. You might think the rooftop water tower is just some rotting old, unused piece of infrastructure from a bygone era, but after reading this article from 6sqft you’ll realize they’re just as much in use today as they were decades ago. As a result, the rooftop water tower has become a well-recognized symbol of NYC, appearing in graphic designs on hipster tees, screenprinted tea towels sold at outer borough flea markets, and stenciled graffiti walls throughout the city.
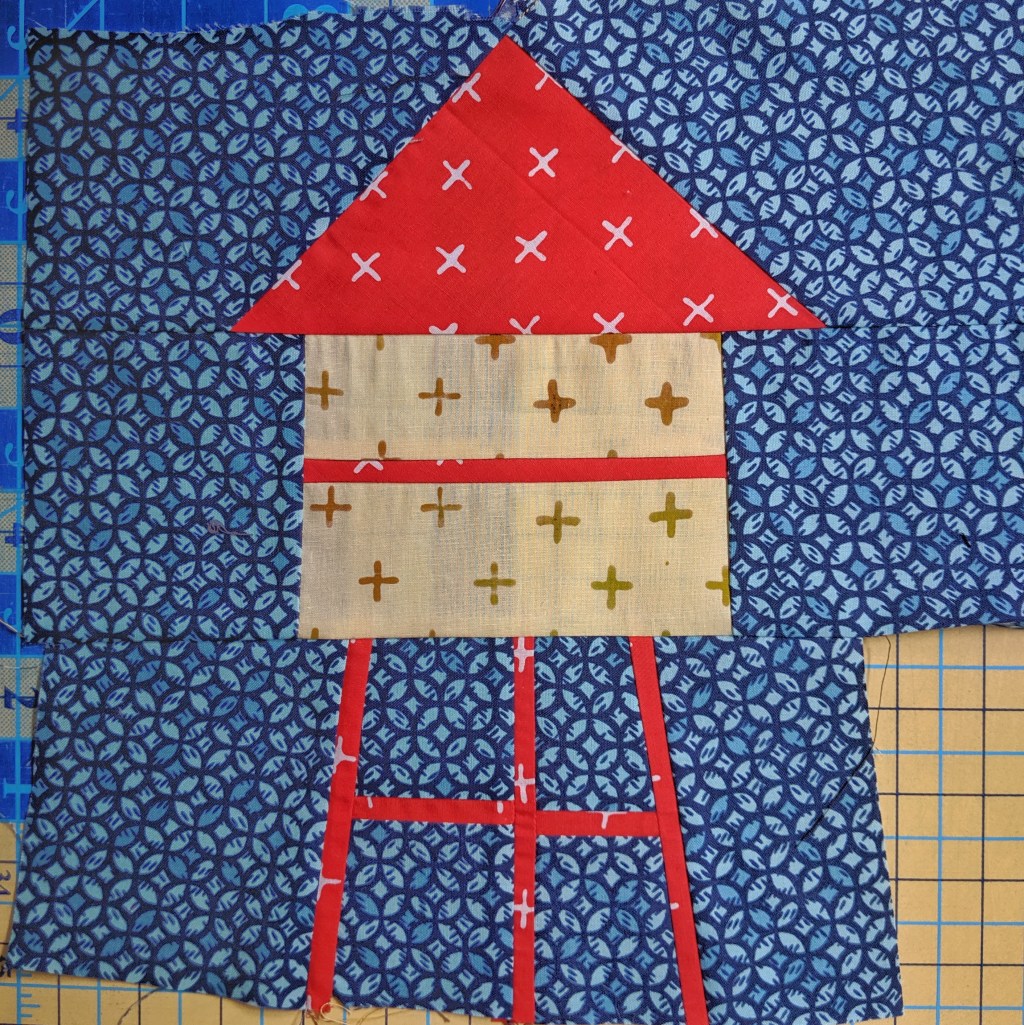
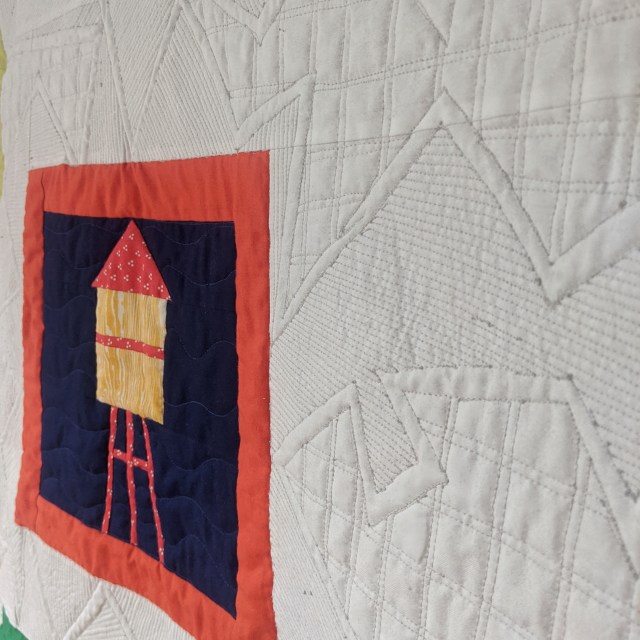
When I was working on my BK Snaps quilt, I wanted the blocks to represent different “snapshots” you would find around Brooklyn. Of course, I had to include a rooftop water tower. I used scraps to make my prototype block, and it was so cute I decided right then and there that I would design a whole quilt around that block at a later date.
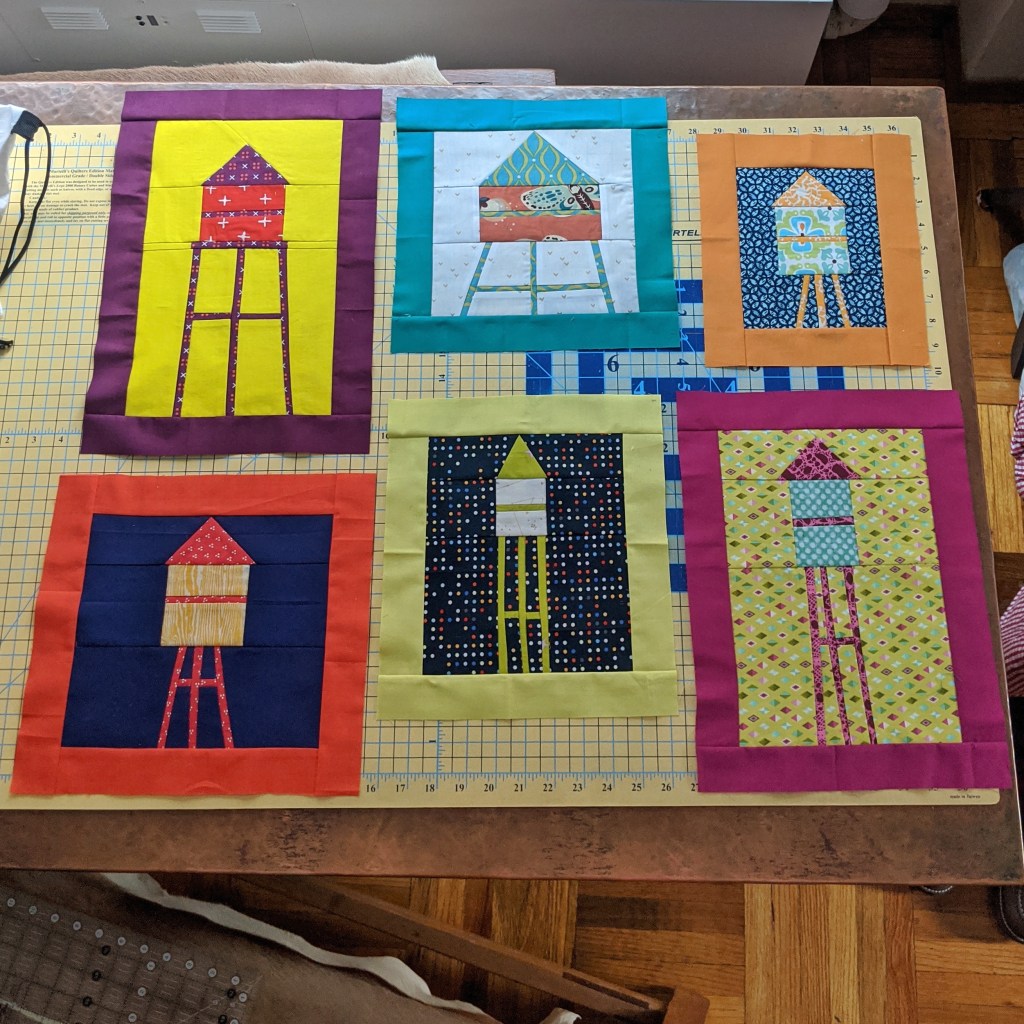
A few months ago I finally started working on a bunch of different water tower blocks. I was determined to only use scraps for the blocks themselves and improv piece them so they were each unique. Once I made a few, I started thinking about the overall layout I would want for the quilt top and decided I wanted it to look like a gallery wall of “framed photos” of rooftop water towers. So I framed each block with matching solid strips of fabric and kept making blocks in different shapes and sizes until I was satisfied with the layout.
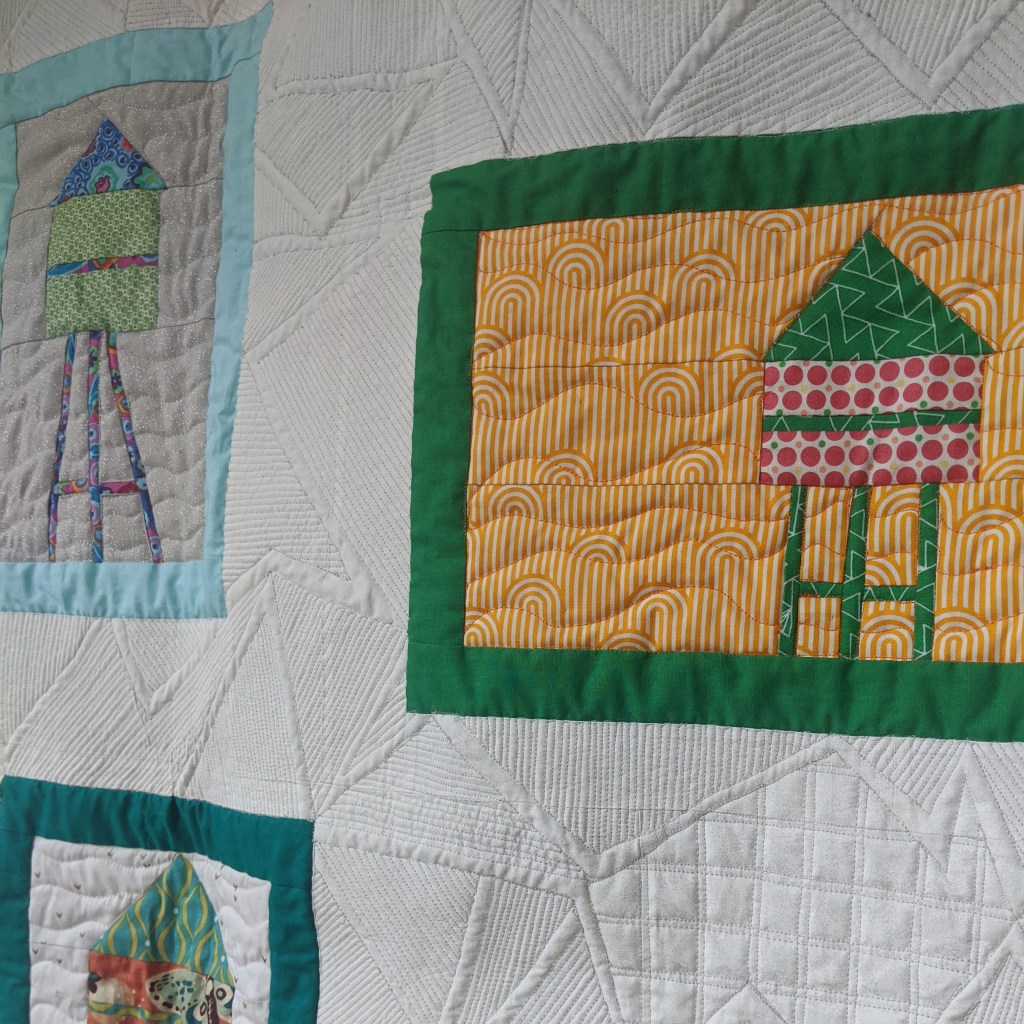
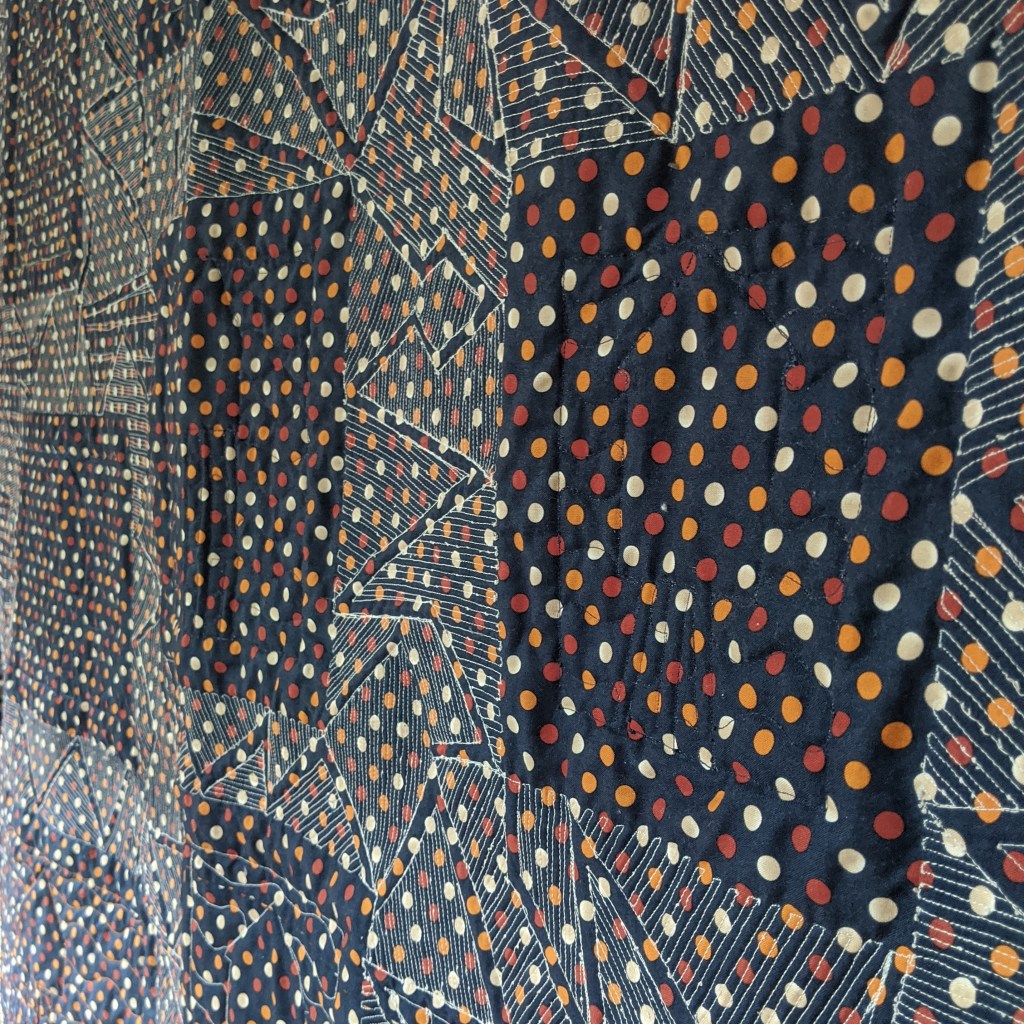
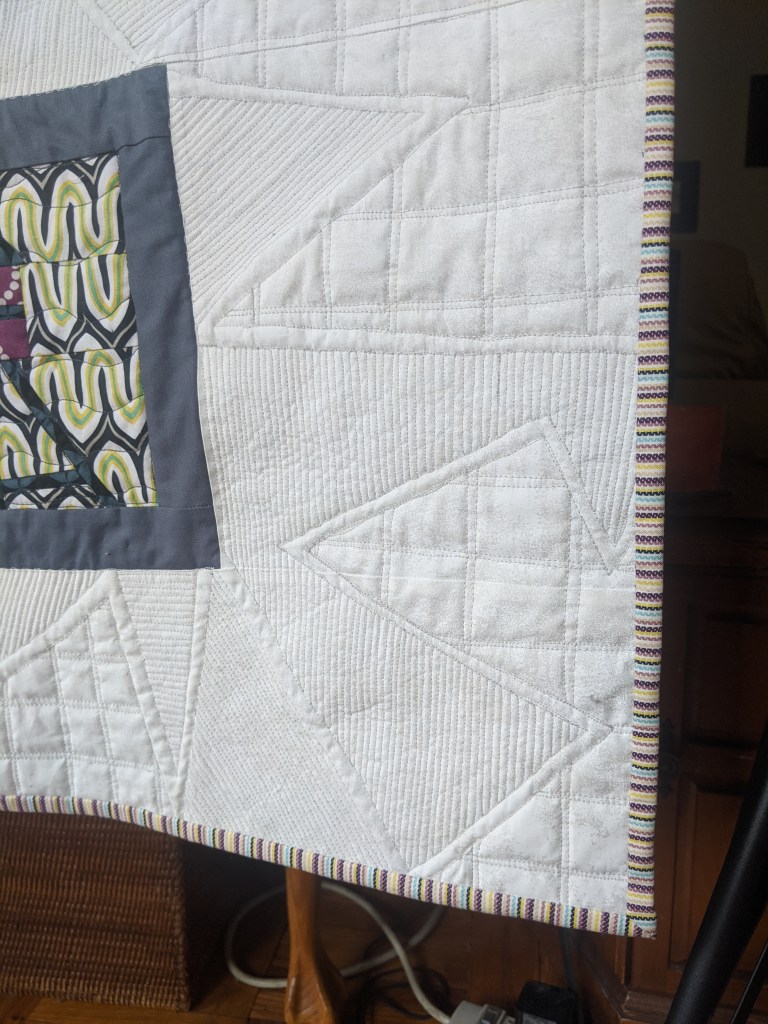
As I was piecing the quilt top, I began thinking about the overall quilt design. Because the blocks are scrappy and cutesy, I wanted the quilting to contrast — maybe something a little more graphic and urban. I decided to fill the white background sashing with various triangular shapes and sharp-angled polygons filled in with very dense matchstick quilting. Then every once in a while, I would break that up with a more open grid-like quilting design. I find the overall effect to have a graffiti-like quality, which I think is appropriate for the subject matter.
Because the majority of the quilting is very dense, I decided to keep the quilting inside the blocks very simple. I stitched in the ditch around each water tower and then quilted easy wavy lines in the “air” around each tower. I ultimately decided to not quilt inside the actual frames at all because I wanted a noticeable break between the dense quilting of the sashing and the very low-volume quilting of the water towers. (A distinction you might notice more on the back of the quilt.)
My final design decision was using a striped binding to frame the entire “gallery wall.” I was fortunate enough to have this fabric on hand, and the colors of the stripes are varied enough that they seem to match whatever colors are near them. And the colors of the binding are light enough that they don’t take the eye away from the blocks, which should be the focus of the quilt.
Et voilà! That’s my Rooftop Water Towers quilt! It took me FOR-EV-AH to finish, but I’m so happy with how it turned out. I really love how it combines urban imagery with a traditional crafting style. Have you ever been inspired by your surroundings and created something as a result? I’d love to hear about it, so please post comments and questions below. Share your own crafting stories, please! Happy making, everyone!!
I just completed a new quilt, and this video takes you from the beginning to the end of the process. And what a process it was! Whew!! I’d love to hear about your own quilting and making process, so be sure to leave any questions or comments here or on my YouTube channel so we can keep the quilting conversation going. And please subscribe so you don’t miss out on any upcoming videos!