Creating a Quilt: Part 2 – Prototyping

Last week’s post was about coming up with the idea for an original quilt. This week is about my least favorite part of the creation process — prototyping. Ugh. In past posts I’ve mentioned how I love every aspect of the quilting process, but I lied! Prototyping is a necessary evil to all acts of creation, whether you’re making a quilt, repainting your bedroom walls, or designing a more efficient way to get through airport security. (Could someone get on that, by the way??) The reason I do not like prototyping is because it consumes so much time and energy and even resources (like thread and fabric if we’re talking about quilts), resulting in 99% of the work being thrown out. But it’s that final 1% that makes prototyping an absolutely essential ingredient to the creation process. It’s so much better to spend all of that time and energy figuring out what works and, more importantly, what does NOT work right at the beginning rather than getting halfway through a quilt top only to discover you should have done it all differently.

And so I have begun my prototyping process. I’m going to share my failures and what I’ve learned so far. I still have more prototyping to do, but I think you’ll get the idea of how beneficial this is from what I’ve accomplished so far.

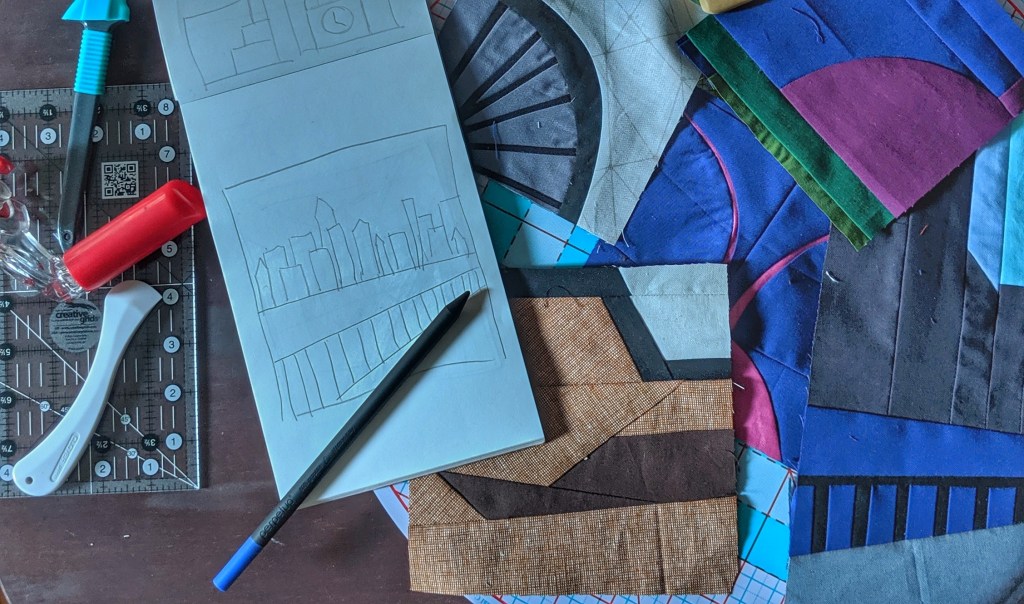
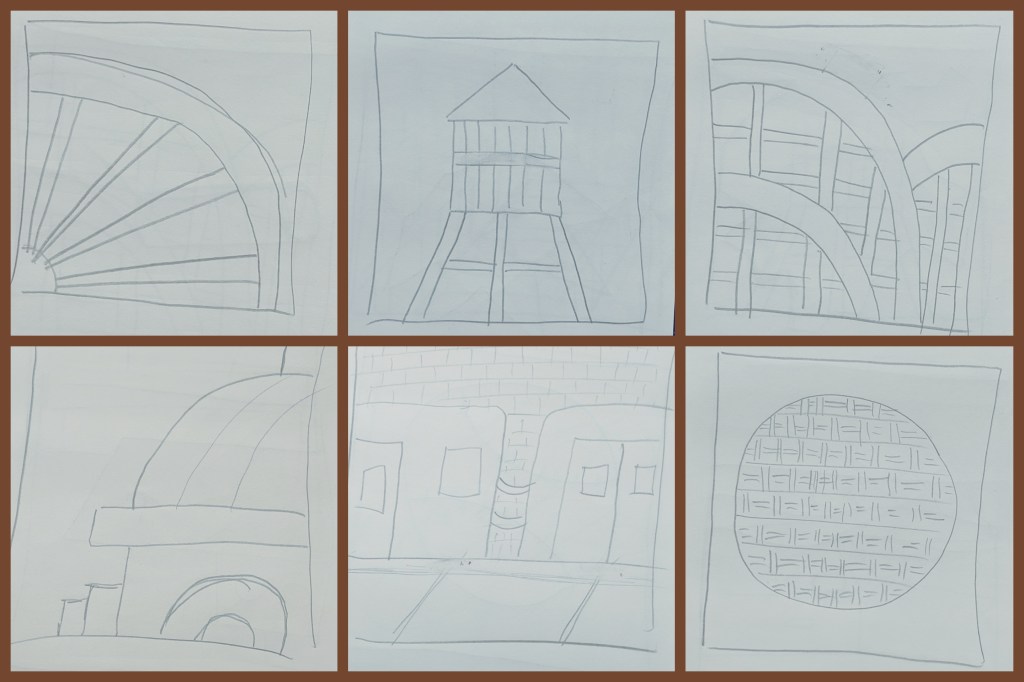
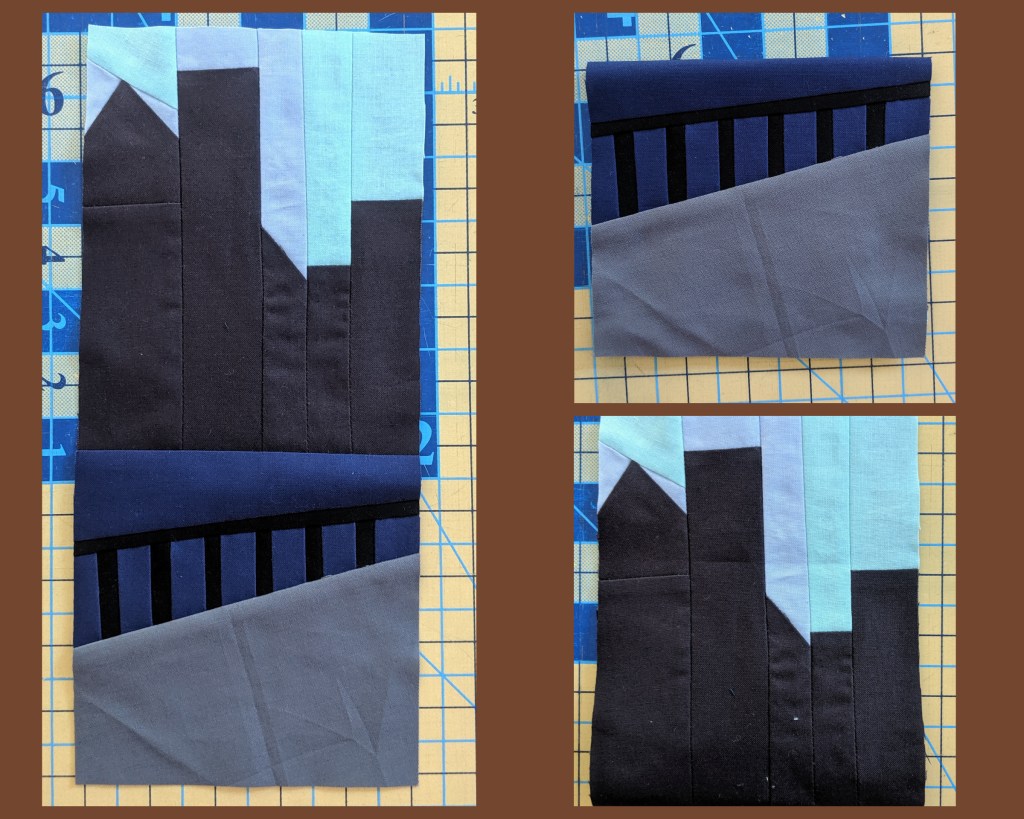
One of the aspects of my design that I need to figure out is the size of each of the blocks. I decided to pick one of my sketches that would probably require the largest size block and see where to go from there. The block is based on the view of Manhattan from the Brooklyn Promenade in Brooklyn Heights. Keep in mind I’m just using scrap fabric, so this is not necessarily the color scheme I’m going with for the overall quilt. I like the overall outcome of this block, especially the railing of the promenade, but I made my first discovery soon after finishing this block. I realized that this was looking way too literal for my overall vision of the quilt. After making this block I realized I really want my blocks to be far more abstract. Simply by splitting the skyline from the promenade, I created two abstract blocks that I preferred far more than the original one.

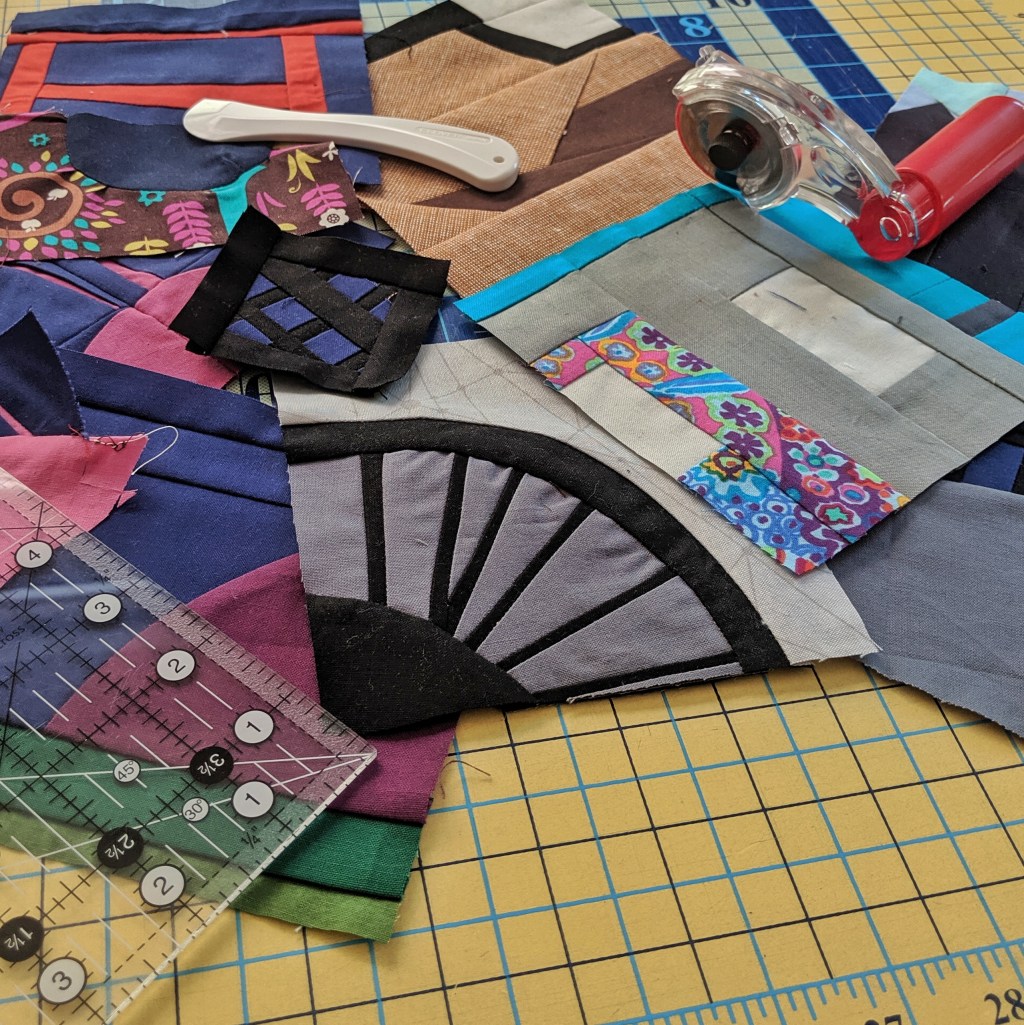
Next, I decided to work on some improv curves, which I’m kind of obsessed with. I actually really like how this bicycle wheel came out and probably won’t change too much about it, other than the colors. But this block brought up yet another important discovery for me. I really liked the size of it. But I still hadn’t decided if I wanted all of my blocks to be the same size or if I wanted to mix them all up. I could visualize each way, and they both appealed to me.

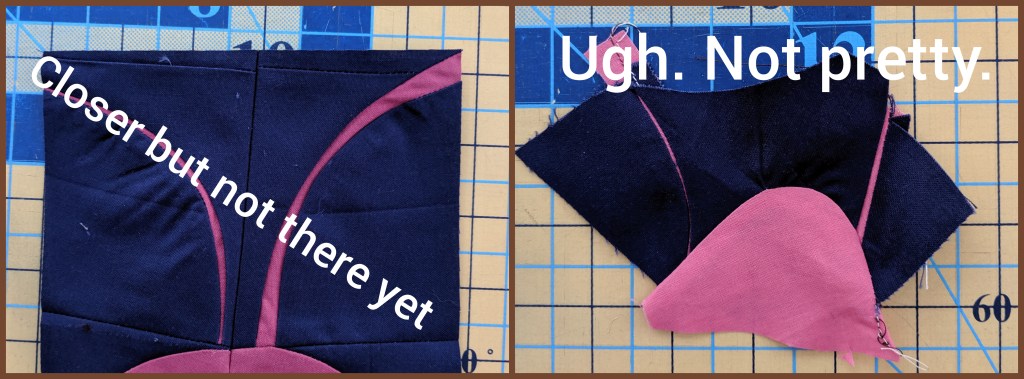
Since I had such success with my bicycle wheel, I decided to attempt more improv curves with my cockroach block. Blech! What a disaster! The first one did not work AT ALL. For the second attempt, I created two separate blocks and then sewed them together. It’s better, but it’s still not what I ultimately want. I’ll need to keep working on this one before I attempt it with whatever real fabrics I’ll ultimately choose for the quilt.

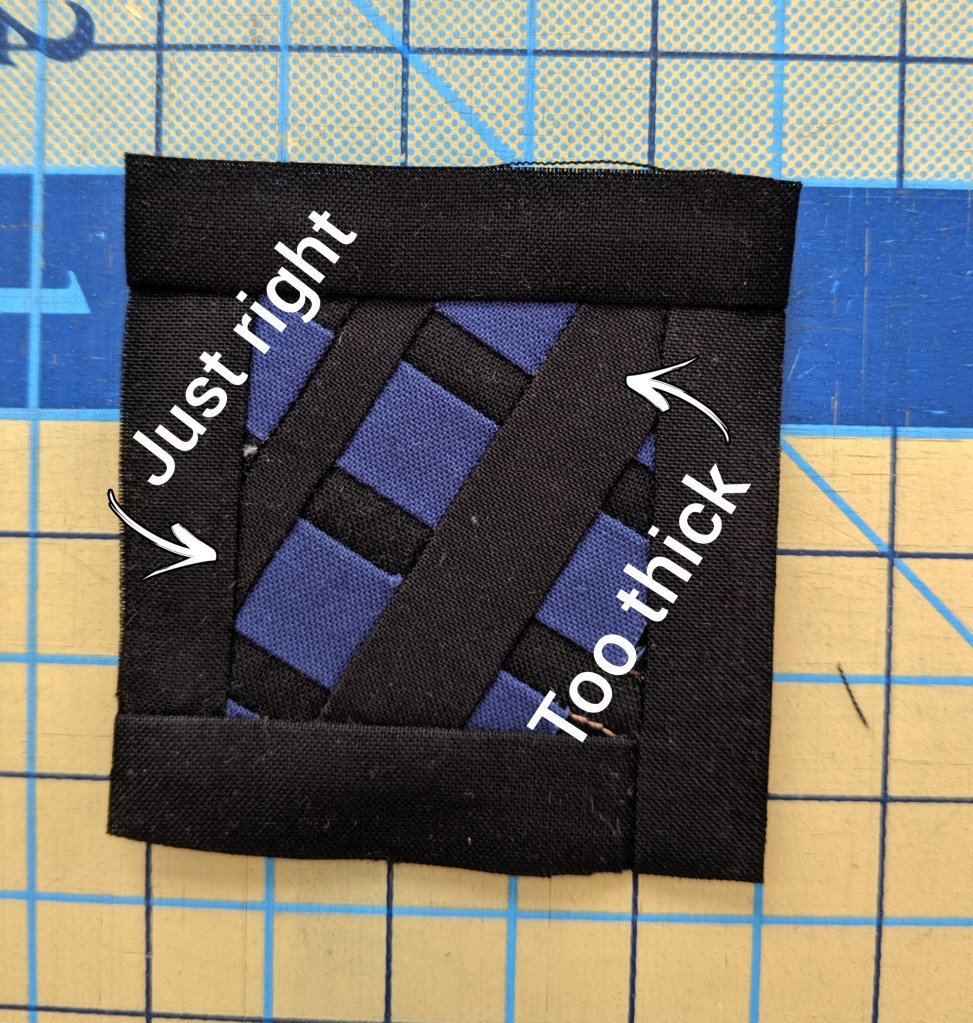
As I was thumbing through my sketches I realized many of my blocks will use a grid, so I decided to make a little sample of that to see how that would turn out. Once again, I made an important discovery, which was about how thick I wanted to grid lines to be.

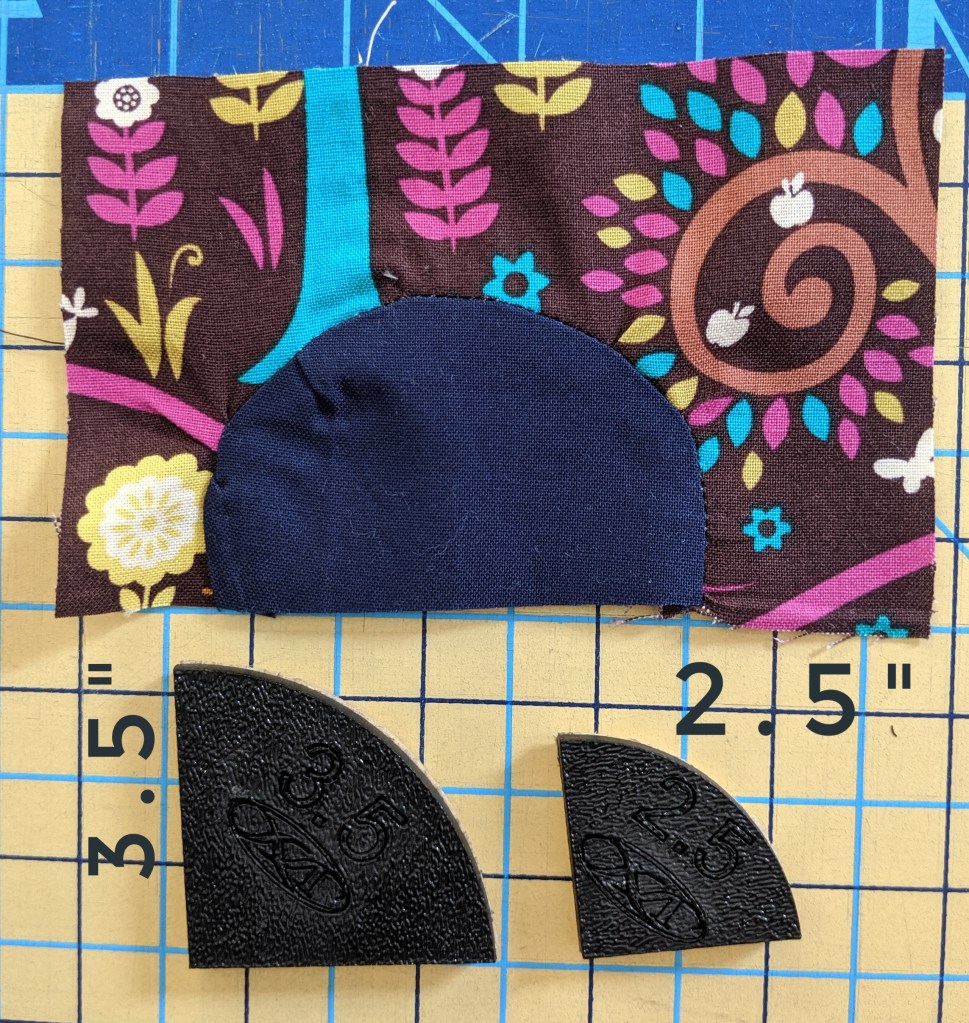
I then made what turned out to be my largest block yet, which is based on a fire hydrant. I actually like how it turned out, though the curves at the bottom of the block were not ideal. That’s when I realized I actually have smaller circle templates that I should have been using. Important lesson, people — utilizing all of your resources requires you to actually remember all of the resources you have!!

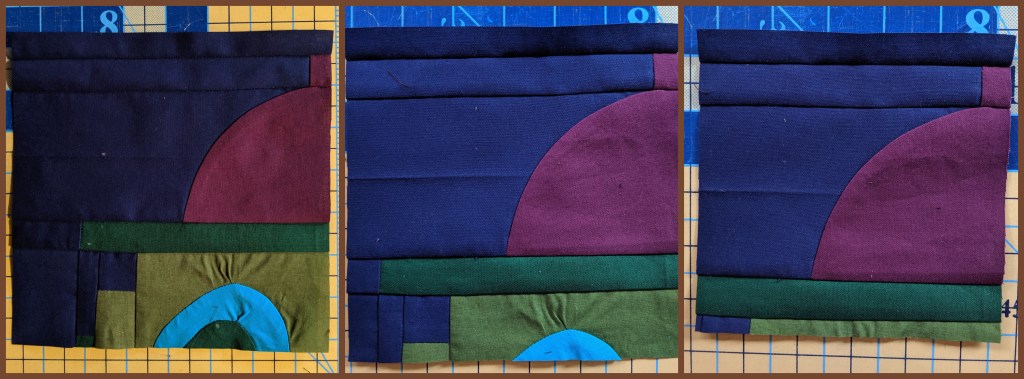
The last block I’ve worked on so far is my subway train block. When I finished it I thought it was fine. Just fine. But something was bugging me about it. The next day I was working out and staring at all of the blocks I’d made in between sets and — boom! — I had a big ol’ revelation. I decided to cut that subway train down to a 5.5″ square, and I really liked how it became a bit more abstract and more like a random modern quilt block than an attempt to create a realistic subway train. It was a very subtle difference but really impacted my thinking.

I then decided to cut down my fire hydrant block to see if that improved as well. And it did! I think the extra blood pumping into my brain during my workout helped me work through this problem, so I encourage you all to incorporate regular physical exercise into your creative process. It really helps!!

So now I’ve made some decisions about my overall quilt design. Because I’m ultimately an improv piecer, I’m going to be using improv piecing for all of my blocks, which means they’re all going to come out to whatever size they come out to. But then I’m going to cut them all down to 5.5″ squares. And depending on how large the original blocks turn out, I might be able to get more than one 5.5″ square out of it. This also means I’m definitely making my blocks more abstract than realistic. Perhaps a future Brooklyn-inspired quilt will use these same sketches for something more realistic, but this one is going to be modern as hell (or at least that’s my goal).

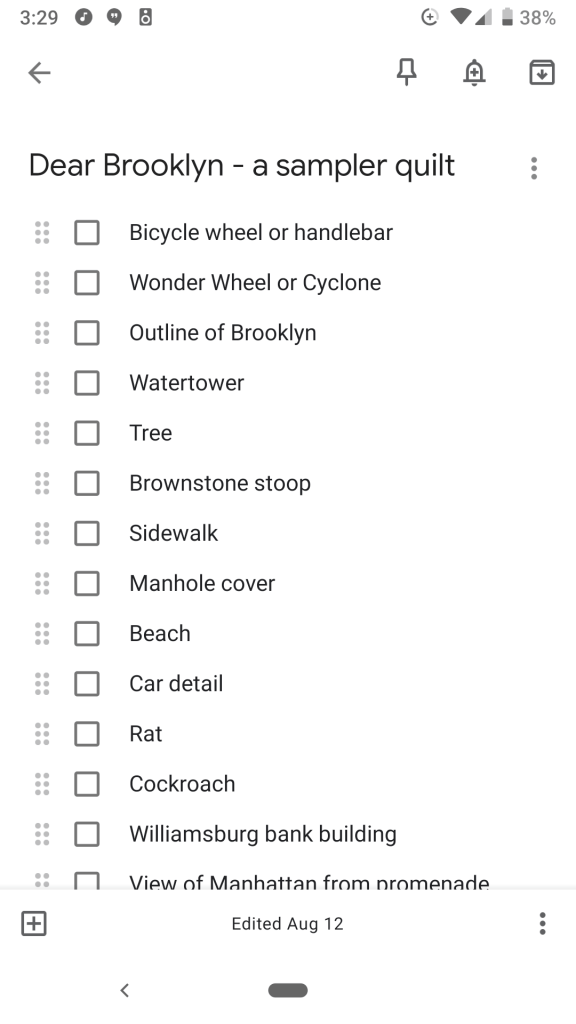
My last important bit for this post is stressing the importance of actually notating all of these discoveries somehow. I’m using Google Keep on my phone to list all of my thoughts so far. This whole process is going to take some time, so I need to make sure I don’t forget some crucial discovery I made the month prior once I actually start sitting down to my machine with the real fabric.

For now, I need to keep prototyping and fine tuning my ideas. While I don’t really enjoy this part of the process, I am well aware that it is far from a waste of time. And what about you? Have you ever created something from a completely original idea? What was your process like for making it a reality? Please share your thoughts and ask any questions in the comments section below. Happy creating!!

Creating a Quilt: Part 1 – Inspiration and Ideation

The Brooklyn Quilters Guild 2020 quilt show is coming up, and I finally came up with an idea for the quilt I want to make for it. My friend Shannon Reed (@knittingchick on Instagram and @sreed151 on Twitter) suggested I use this as an opportunity to post my process from the very beginning to the very end of the quilt’s journey. I thought that was such a great idea, so here we go! Thanks, Shannon!

When I’m trying to think up a completely new quilt, the first thing I do is look for inspiration. Sometimes the inspiration is given to me by a prompt for a quilt challenge or contest. Sometimes — VERY rarely — the idea just pops into my head fully formed and my finished product looks exactly like what I pictured in my head from the very beginning. This happens very rarely for me. In fact, it’s maybe happened one time so far. Generally, I’m a big fan of prompts and parameters.

In this case, however, my inspiration came in a roundabout way and I just allowed my brain to take that curvy path to what I think will be a pretty cool quilt. I’ve been looking at all the beautiful quilt blocks people have been posting on Instagram for the Tula Pink #100blocksin100days challenge inspired by her City Sampler book, which happens around this time every year. And then I was chatting on my Facebook page with Johnny Barfuss (@johnnybarfuss on Instagram) who had suggested I take a look at Elizabeth Hartman‘s book Patchwork City, and I mentioned I had been thinking about designing my own blocks. Like all good quilters, Johnny was very encouraging. So I started doodling some blocks in my sketchbook without any ultimate goal in mind.

When I looked into Elizabeth Hartman’s book, I read how her blocks were inspired by objects and places in her daily life, and — boom! — that was when inspiration struck. Eureka! I realized I could combine this desire to design some new blocks with my desire to create an original quilt for the upcoming quilt show. I would sketch out a bunch of images that pop in my head when I think specifically of Brooklyn. Then I would make those into a series of blocks and create a Dear Brooklyn sampler quilt, as an homage to the Dear Jane quilts that I ogle every time I go to a quilt show.

My first step was listing all of the ideas I could think of for my quilt blocks. At this point I wasn’t thinking about what would make a good block and what would be impossible. I just let the ideas flow and kept the list going. This is the beginning of the ideation phase (just in case that’s a new concept for you). In the design world, the ideation phase generally involves a whiteboard and hundreds of Post-its. My version involves my smartphone’s Google Keep app and a sketchbook.

Once I had a good-sized list, I started sketching the ideas out. My sketches varied between abstract and realistic because I hadn’t decided yet what direction I ultimately wanted to take my quilt. I think it’s important at this very early stage of the creative process that you don’t put too many limitations on yourself. Editing will come later and is necessary for the final product, but right now just allow yourself to create anything and everything that comes to mind. You never know — one of those absurd, impossible ideas might end up being what works the best.

I started looking over the several sketches I had drawn and decided I wanted my quilt blocks to lean more towards abstraction versus realism. In fact, right now I’m thinking I want them to be so abstract that someone looking at my quilt won’t even necessarily know the reference material for each of the blocks. So I started making thumbnail sketches of the more realistic blocks, focusing on a small section of the overall sketch. As the creator of the quilt, I want to be able to look at the blocks and know exactly what inspired them, so I don’t necessarily want the blocks to be super abstract. But on the other hand, I’m not so concerned that anyone else looking at the quilt will be able to instantly see the source material for each block. In other words, I’ll know that block with a series of curves was inspired by a cockroach, but a random viewer of my quilt would probably never guess that’s how the block came about.

And that’s where I’m at so far. I still have a lot of sketching to do for most of my ideas. The next phase will be playing with scraps of fabric to see how the blocks work in reality and not just on paper, so you can look forward to seeing how that turns out in the next post about this process. I’d love to hear about how you find inspiration in your quilting and other craft projects. Do you prefer parameters when you’re creating? Or are you someone who can some up with ideas completely out of the blue? Please share in the comments section below, and let’s get a conversation started. Happy quilting!

Quilt Shop Road Trip – August 2019

I grew up in Maumee, OH, a suburb of Toledo. My parents and brother and his family still live there, so I try to visit at least twice a year. My foray into quilting has given me a fun new way of re-exploring my hometown and the area by finding local quilt shops. My latest trip was the best one yet!

I discovered The Quilt Foundry fairly soon after I started quilting two and a half years ago. It’s located in downtown Maumee in the historic Buttergilt Building. The shop consists of two large rooms filled with bolts of fabrics as well as an additional spacious classroom and workshop area. I try to get to this shop every time I’m visiting the family, and I’m never disappointed. My only regret about this shop is that I wasn’t quilting when I actually lived in Maumee, so I wasn’t able to take advantage of all of its myriad offerings. Although maybe it’s for the best because I don’t know if my bank account could have survived a quilting addiction at such a young age!

My mom helped me with researching more quilt shops in the area and found the Quilters Travel Companion, a website with maps and links to various quilt shops and quilt shows all across the United States and Canada. That’s how we discovered The Door Mouse just outside of Bettsville, OH. This is an area of Ohio I’ve never really explored, so it was fun driving through the country. We even spotted a couple of barn quilts, though I sadly did not take any pictures of them. (Must be better about these things!) The Door Mouse is a huge store in a renovated barn out in the middle of nowhere. They have pretty much any style of quilting cotton you could want as well as a huge selection of flannels.

My niece is a little bit obsessed with Ann Arbor, MI, which is just about an hour’s drive north of Toledo. So we decided to take a day trip over the state border, and of course I had to visit at least one of the local quilt shops while we were there. Now, I’m going to admit that looking at the photos of the exterior of the Ann Arbor Sewing Center, I thought it was going to be kind of a lackluster shop without a lot of personality. Boy, was I happily wrong!! This shop has a HUGE selection of fabrics in all styles. They also sell a large variety of Bernina, Husqvarna Viking, and Pfaff sewing machines. I had a truly lovely conversation with one of the staff and Doni Houghtaling, one of the owners of the store. I truly felt welcomed, and if I lived in Ann Arbor I would definitely be taking advantage of their full range of classes and clubs they offer every day of the week.

We visited the final quilt shop of my trip on our way down to see family in Cincinnati. We took a quick detour to Loveland, OH, and stopped by The Quilter’s Studio of Loveland. This is yet another enormous quilt shop, boasting nearly 5,000 bolts of fabric. And, man, if you love batiks, this shop is an absolute MUST. In addition to the hundreds of batiks, they have a great selection of contemporary quilting cottons. They also have four longarm machines that were being rented out by four customers when we visited the shop, all of whom were more than happy to show off their gorgeous quilts to my parents and me.

My quilt shop road trip did not disappoint in the least. I am always amazed at just how friendly and helpful every single person I’ve ever met in a quilt shop is. I mean, seriously! It must not be possible to work in a quilt shop without being the friendliest person on the planet! The quilting community is a true community in the best sense of the word, and I feel so fortunate every day to be part of it.

I’d love to hear about your favorite quilt shops — where are they located? What do you love about them? Any fun stories you want to share? Please leave a comment and show some quilt shop love!!

Social Media – for Better and for Worse

I’m sure I’m not the only one who has a love/hate relationship with social media. How many of you have decided to take a social media break at some point in the last five years? I’ve personally never taken a complete break, but I’ve certainly seen my participation ebb and flow over the years. Using social media to keep up with friends and family, to participate in communities around the world, and to even have a successful career can be amazing. But – and I know I’m not spouting off anything new here – it’s not all wine and roses, folks. I’m really interested to hear your opinions about social media and how you use it (or don’t use it). I’m also interested in hearing your tips about how to use it successfully and how you keep yourself from going crazy with it. So please add your comments and let’s get a conversation going through this blog. (Which is yet one more example of social media!)

I’ve been a somewhat reluctant adopter of social media. It took me a while to create a Facebook account. I only joined Instagram about two and a half years ago. I just created a Twitter account a couple months ago. I’ve always had a bit of an inner struggle between wanting to put myself out there and share my thoughts and achievements with everyone versus relishing my privacy and not wanting everyone up in my business all the time.

I certainly acknowledge the benefits that social media can provide. I started my Instagram account when I decided to try out quilting because I thought it would be a fun way to both archive my progress and add a little accountability to my process – it put a bit of pressure on me to keep creating. To my surprise, what I have ended up loving most about Instagram is the amazing community of quilters from all over the world with whom I’ve connected. I think that’s where social media really shines. I post a pic of my latest quilt and I receive such beautiful encouragement. Whenever I have a question about a technique, I receive so much helpful advice.

And of course my whole quilting journey began with social media by taking a class on Craftsy (now mybluprint.com). I actually loved that I could sit in the privacy of my home and try out a brand new craft without any of the pressure I would normally feel in a classroom situation with a live instructor and students. And Craftsy was great about taking advantage of social media to give that classroom feeling by allowing all of the students who had taken the class to post comments and questions, to which the instructor would always respond. I took the class many years after it had originally been posted on the site, and the instructor still answered my questions rather speedily. I honestly may never have tried quilting if it weren’t for the magic of social media.

But as we all know by now, social media has its pitfalls. I’m sure we all have our individual issues with social media, and feel free to commiserate. I mentioned above how I joined Instagram so that there was a little bit of pressure to keep creating. Well, be careful what you wish for, right? I think my main personal issue with social media is the pressure I feel to keep posting and then when I’m not creating anything new, I feel like such a failure. I can logically tell myself that it’s healthy to take time away from your craft so that you can recharge your creative energy, but then I scroll through my Instagram feed and see people churning out amazing work over and over again and I feel so inadequate.

On the other hand, I know some people end up spending more time scrolling through all of their various social media apps than actually doing anything. I’m generally a pretty good manager of my time, so this isn’t a real problem for me. But I can see how much of a time suck this can become. Thankfully there are lots of apps that help with limiting your time online. If you’re having time management issues, I highly suggest you look at the settings on your phone, computer, and tablets and adjust them to help you with that.

And while social media provides so many resources to try new things, it can sometimes be overwhelming. You see so much amazing work online, and then you think, “Man, I will never be able to do that so I just won’t even try.” If that’s something you’re having issues with, I really, really, really hope you’re able to overcome those thoughts and just start making. We all have something unique to offer, so please don’t let us suffer by not being able to see what are sure to be your beautiful creations!

And of course one of the worst aspects of social media is the bullying. It just sucks. If you have control over the content you’re publishing online, you can police the comments so Internet trolls don’t get to post their nasty BS on your site. Unfortunately, you still have to read the comments before you decide to approve or block them. It just sucks. If your content is being published on a larger site that allows all comments to be published, I just advise not to read the comments. Self-care, people. Don’t let the trolls get you down. Man, they really suck.

All that said, I do believe that social media is pretty frickin’ amazing. While I do suggest you practice self-awareness when it comes to spending time and energy online and with all your apps, it’s really such a wonderful way to learn and grow and connect with pretty cool people from around the world. So, hey, how about you connect with me and let me know your thoughts about all of this!