BLACK LIVES MATTER — Please click on the link to find out what you can do to help end the oppression and killing of our fellow human beings.
In this next trunk show video I talk about the creation of BK Snaps, which I created to hang in the 2020 Brooklyn Quilters Guild quilt show. Unfortunately, the quilt show had to be canceled due to the COVID-19 pandemic, so this is your chance to see the quilt up close and personal!
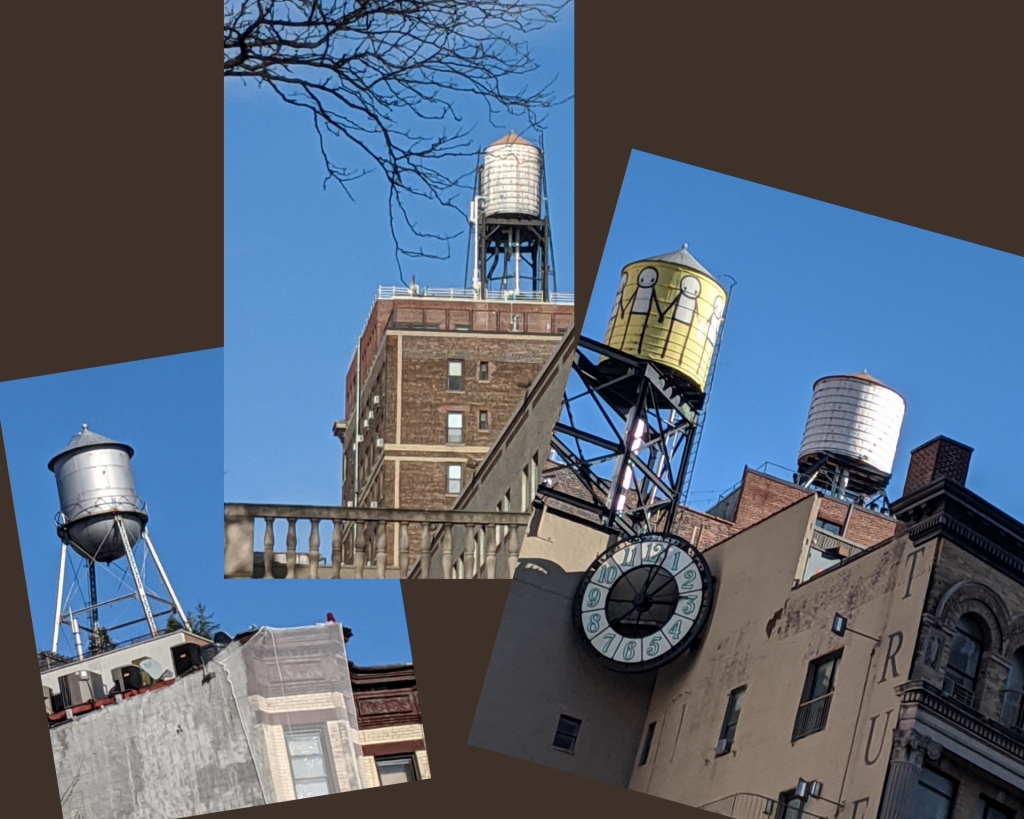
This quilt design was inspired by all of the rooftop water towers you’ll see as you perambulate around New York City. You might think the rooftop water tower is just some rotting old, unused piece of infrastructure from a bygone era, but after reading this article from 6sqft you’ll realize they’re just as much in use today as they were decades ago. As a result, the rooftop water tower has become a well-recognized symbol of NYC, appearing in graphic designs on hipster tees, screenprinted tea towels sold at outer borough flea markets, and stenciled graffiti walls throughout the city.
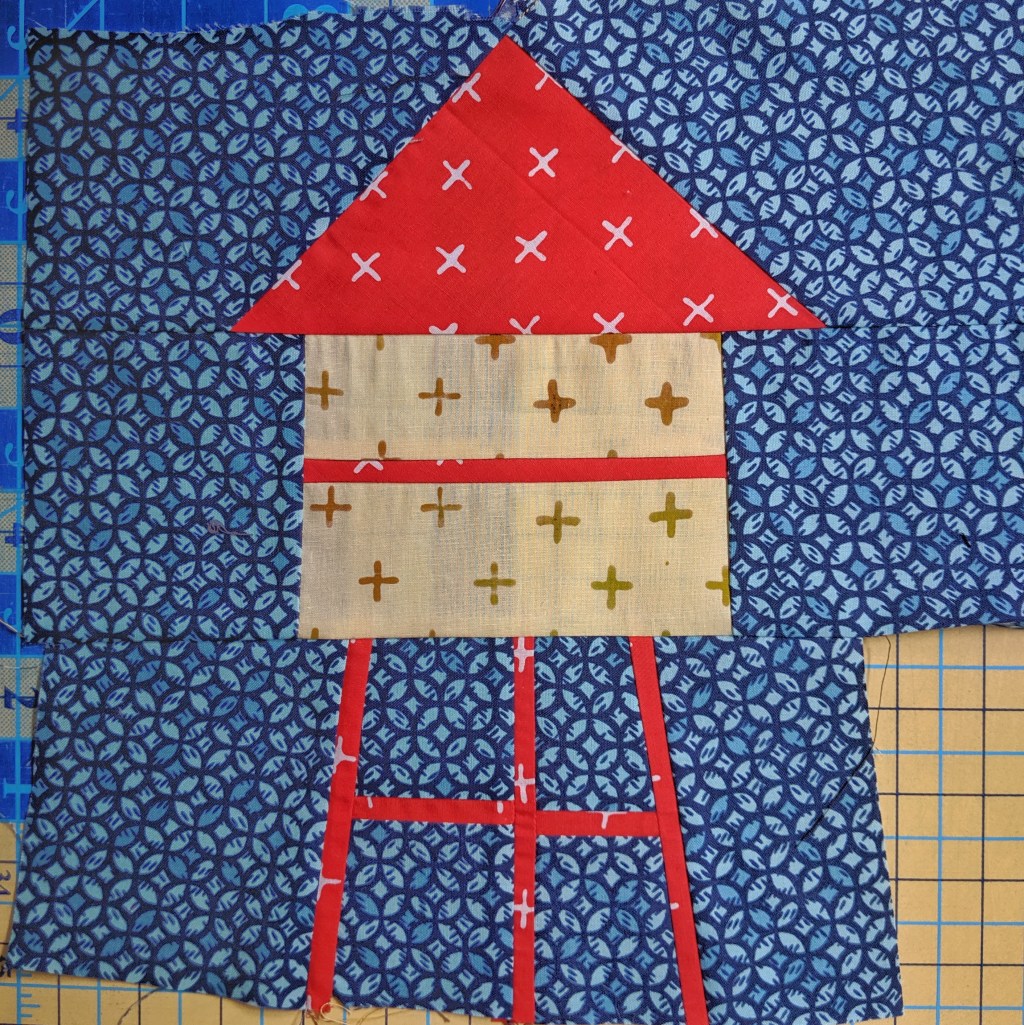
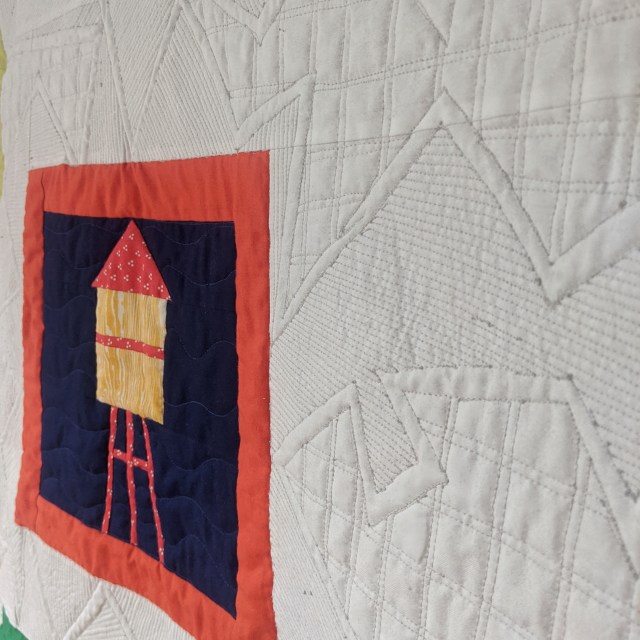
When I was working on my BK Snaps quilt, I wanted the blocks to represent different “snapshots” you would find around Brooklyn. Of course, I had to include a rooftop water tower. I used scraps to make my prototype block, and it was so cute I decided right then and there that I would design a whole quilt around that block at a later date.
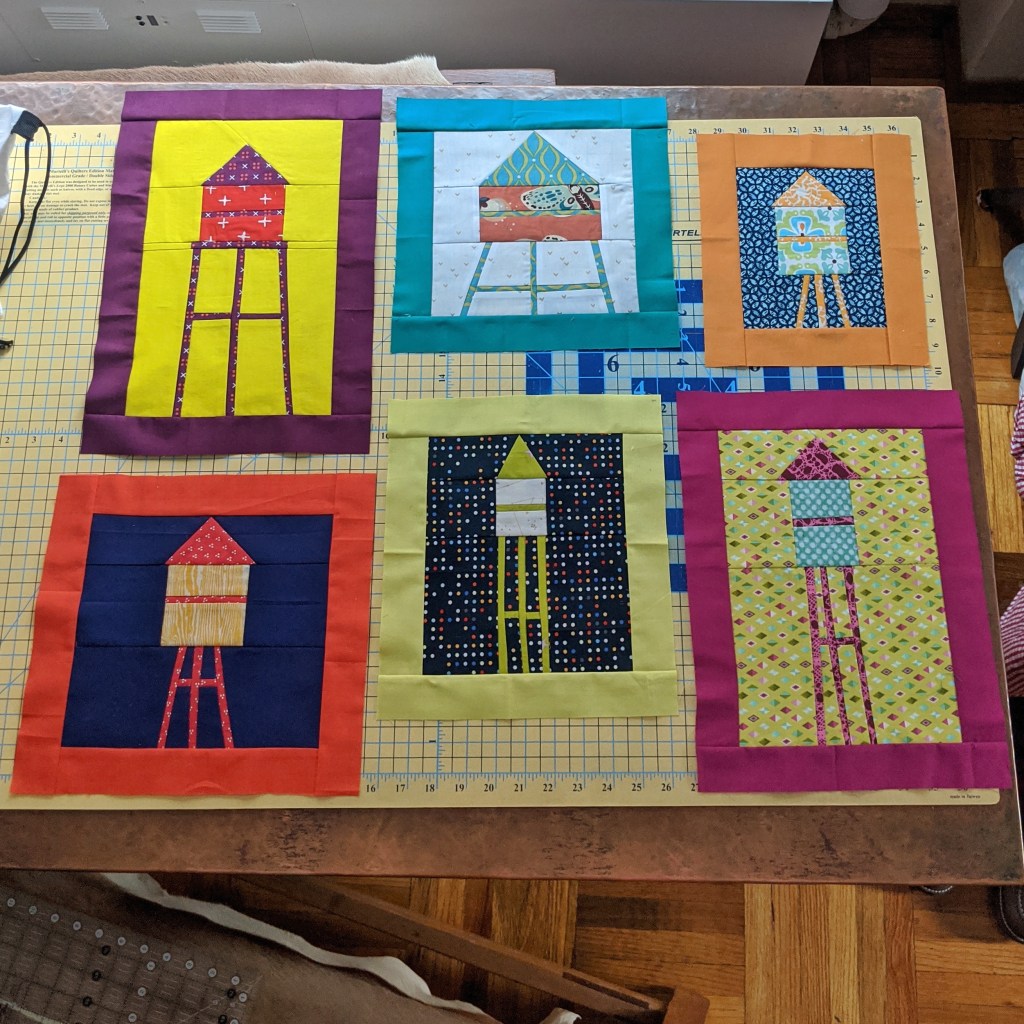
A few months ago I finally started working on a bunch of different water tower blocks. I was determined to only use scraps for the blocks themselves and improv piece them so they were each unique. Once I made a few, I started thinking about the overall layout I would want for the quilt top and decided I wanted it to look like a gallery wall of “framed photos” of rooftop water towers. So I framed each block with matching solid strips of fabric and kept making blocks in different shapes and sizes until I was satisfied with the layout.
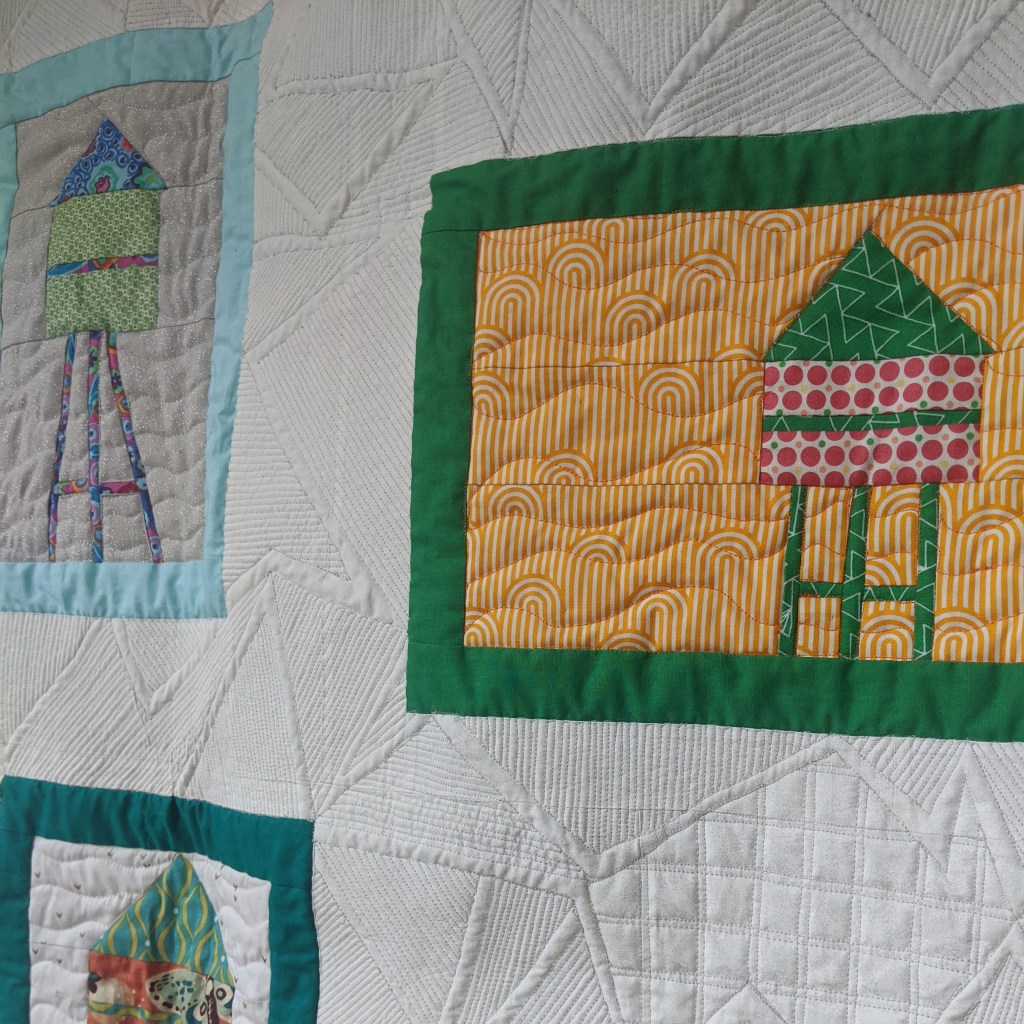
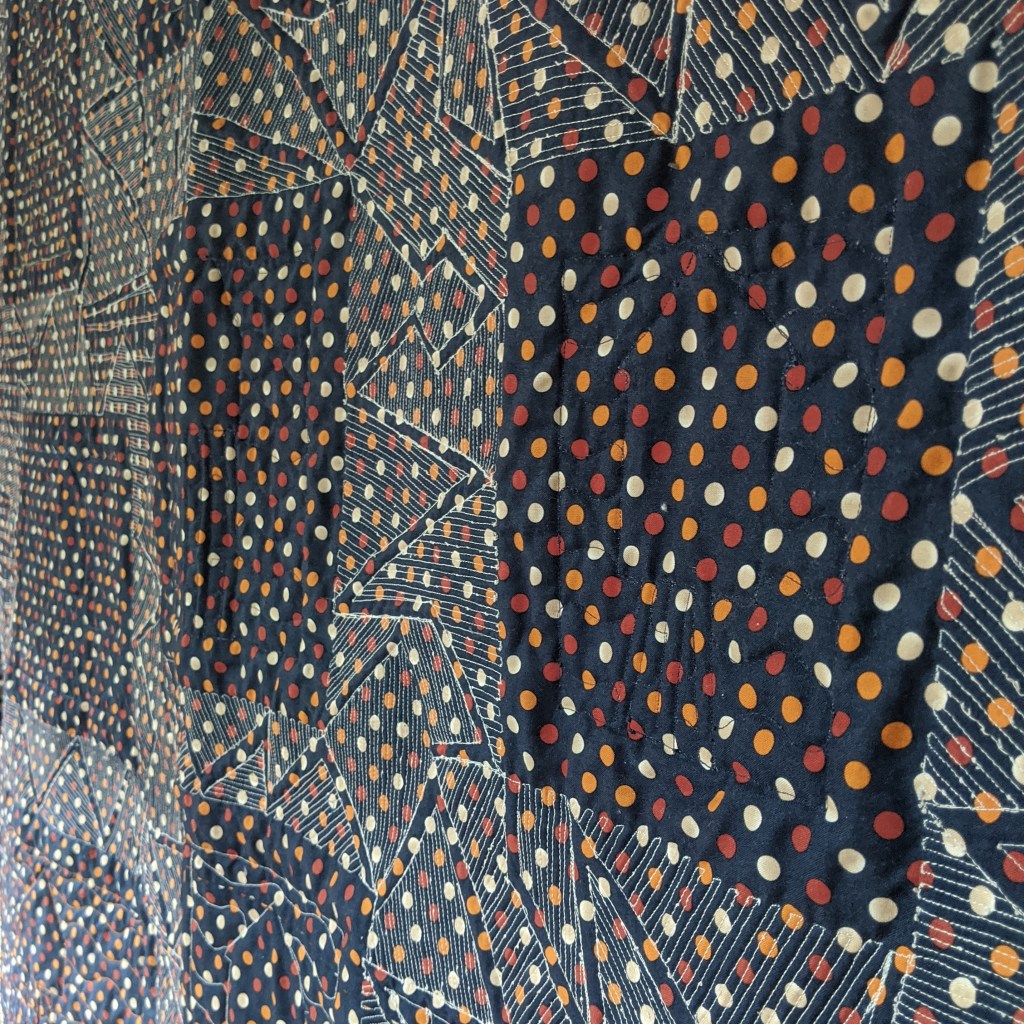
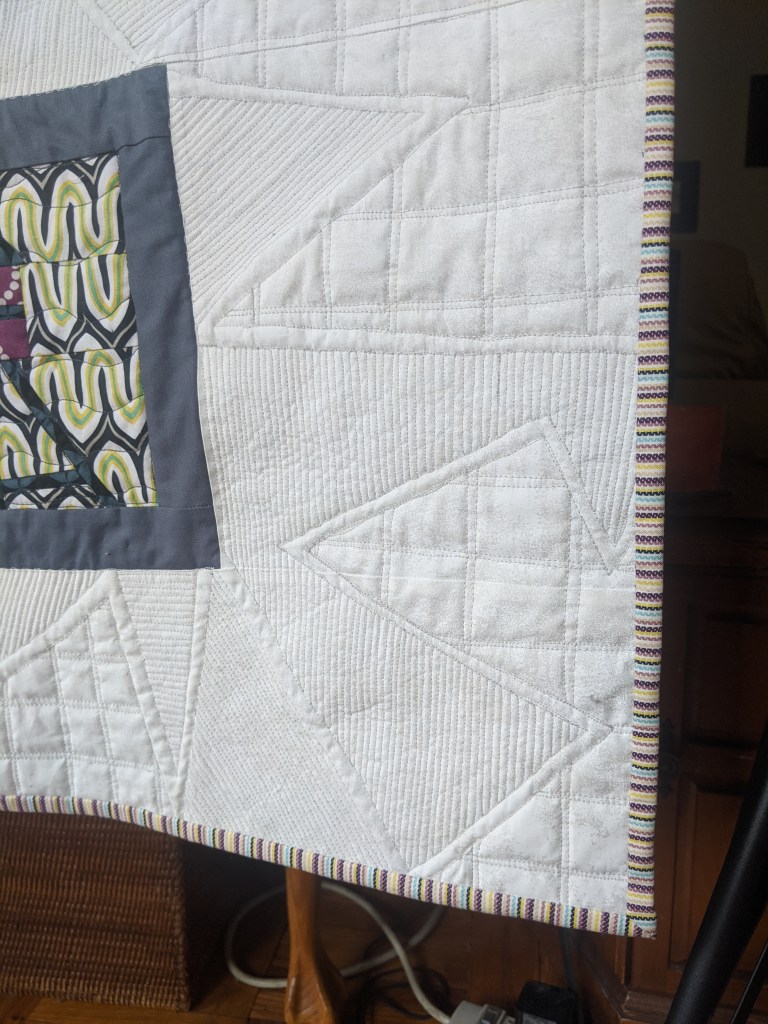
As I was piecing the quilt top, I began thinking about the overall quilt design. Because the blocks are scrappy and cutesy, I wanted the quilting to contrast — maybe something a little more graphic and urban. I decided to fill the white background sashing with various triangular shapes and sharp-angled polygons filled in with very dense matchstick quilting. Then every once in a while, I would break that up with a more open grid-like quilting design. I find the overall effect to have a graffiti-like quality, which I think is appropriate for the subject matter.
Because the majority of the quilting is very dense, I decided to keep the quilting inside the blocks very simple. I stitched in the ditch around each water tower and then quilted easy wavy lines in the “air” around each tower. I ultimately decided to not quilt inside the actual frames at all because I wanted a noticeable break between the dense quilting of the sashing and the very low-volume quilting of the water towers. (A distinction you might notice more on the back of the quilt.)
My final design decision was using a striped binding to frame the entire “gallery wall.” I was fortunate enough to have this fabric on hand, and the colors of the stripes are varied enough that they seem to match whatever colors are near them. And the colors of the binding are light enough that they don’t take the eye away from the blocks, which should be the focus of the quilt.
Et voilà! That’s my Rooftop Water Towers quilt! It took me FOR-EV-AH to finish, but I’m so happy with how it turned out. I really love how it combines urban imagery with a traditional crafting style. Have you ever been inspired by your surroundings and created something as a result? I’d love to hear about it, so please post comments and questions below. Share your own crafting stories, please! Happy making, everyone!!
I just completed a new quilt, and this video takes you from the beginning to the end of the process. And what a process it was! Whew!! I’d love to hear about your own quilting and making process, so be sure to leave any questions or comments here or on my YouTube channel so we can keep the quilting conversation going. And please subscribe so you don’t miss out on any upcoming videos!
In this time of social distancing and self-quarantining, the Brooklyn Quilters’ Guild is hosting a virtual quilt-along. Watch the video below to learn all about it, and please join us! As you start putting your blocks together, be sure to post pics on Instagram and Facebook and use the hashtag #BrooklynConnectedQAL. And follow that hashtag so you can see everyone else’s posts. Find the written pattern instructions on Barbara Danzi’s blog. I’ll be posting demo videos throughout. Be sure to subscribe to my YouTube channel so you don’t miss any of them!
All right, folks! If you’ve been following my “Creating a Quilt” series, you’ve seen my process from thinking of an idea all the way up through the quilting design. There are only a few details left, but I assure you they’re just as important as all of the rest!
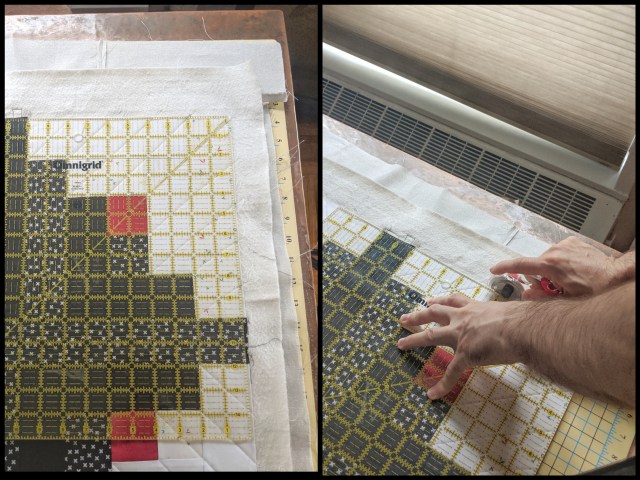
First, I need to trim off all of the extra batting and backing and square up the whole quilt. When I square up a quilt, I try to find some element of the quilt that I can use to measure with that will get me an even trim around the whole quilt. In this case, I used the outer black border. I then place the largest square ruler I have in one of the corners of the quilt, line it up so I’m cutting off an even amount on both sides, and trim up the right-hand side of the ruler and then over the top. Then I use my long 24″ ruler to continue the cut all the way to the next corner.
I tend to switch between my long ruler and my square ruler, but you could just as easily use your long ruler all the way around once you’ve decided on the amount you want to trim. Ideally, I trim as little of the actual quilt top as possible while still making sure that no batting will be seen once I attach the binding.
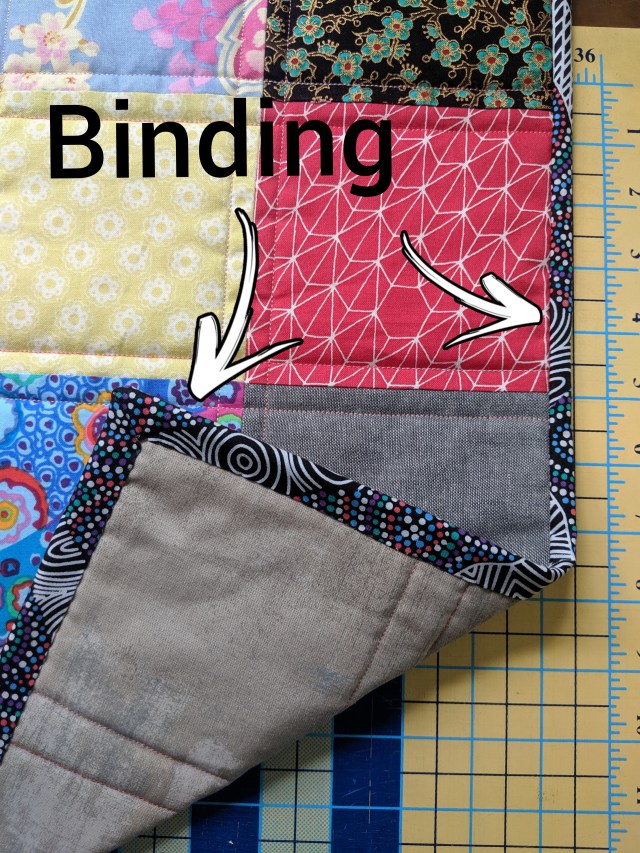
Speaking of binding, that’s the last important design decision that must be made. Actually, before even deciding what kind of binding you want, you need to decide if you want to actually bind your quilt or use a facing instead. Binding a quilt is definitely the most common way to cover up the raw edges of a finished quilt, especially quilts that you want to snuggle under. A binding creates a lovely frame around your quilt top while making sure all of your raw edges are securely enclosed. Depending on what kind of fabric or print you choose for your binding, it can either blend in or really pop out.
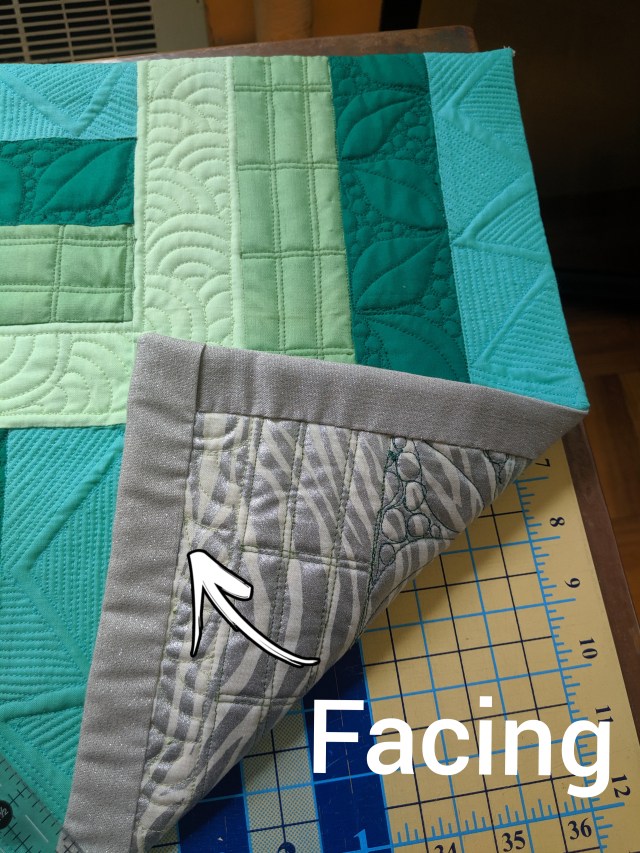
I’ve also used facing for several of my quilts, though usually for quilts that are meant to hang on walls. When you face a quilt, you basically pull the raw edges over to the back and cover them with a different kind of binding that won’t be seen on the front. This gives the quilt a frameless look. I really love facing my quilts when I want the viewer to imagine my quilting designs continuing off of the quilt.
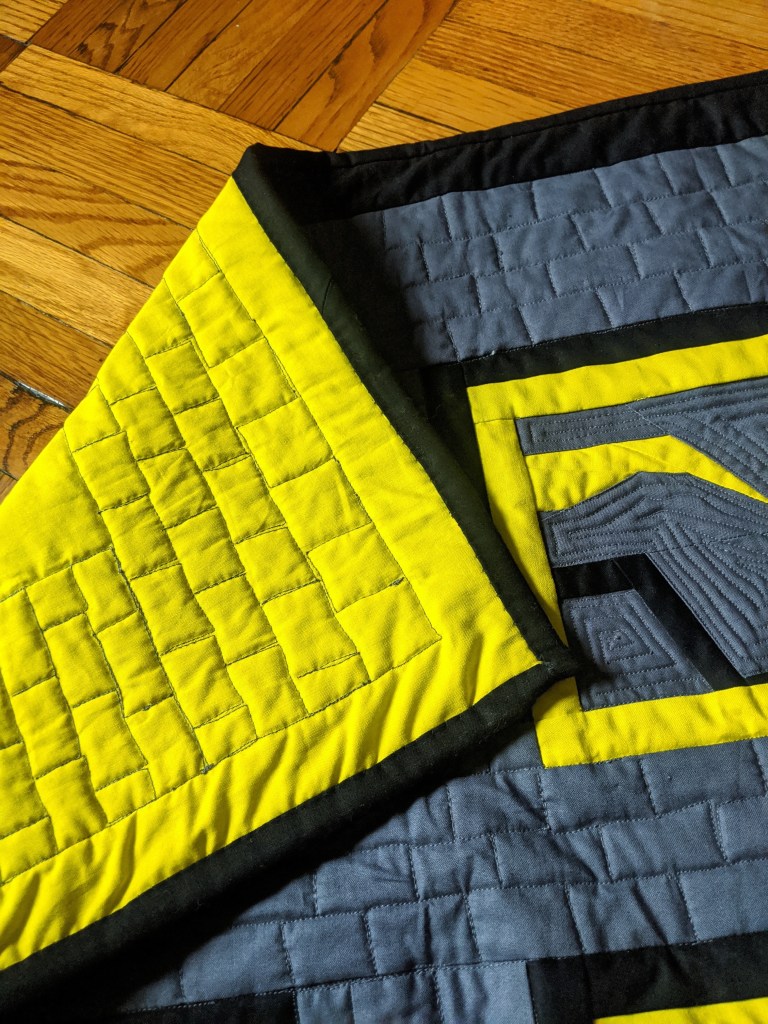
In the case of this quilt, I had already decided to add the black outer border as a solid frame, so I decided a simple black binding that blended in would be the perfect way to finish it. I generally machine sew the binding onto the front of the quilt and then hand stitch it to the back. I really love how it looks on both sides when I use that technique.
Once the last stitch of the binding has been sewn, I usually consider my quilt D-O-N-E. However, when a quilt is going to be displayed, it needs a couple more elements added to it — a hanging sleeve and a label. There are different ways to display your quilt, so if you’re entering your quilt in a show be sure to read the guidelines for how that particular show wants you to attach a hanging sleeve. I went ahead and used some more scraps from my quilt to construct this hanging sleeve. I like how it kind of blends into the back, though I don’t always care so much about that since it won’t normally be seen by anyone.
As for the labels, I like to make mine by hand. I include the name of the quilt, my name, my social media handle, my location, and the date the quilt was completed (I just use the month and year). Because I’m not selling my quilts at this point, I’m not too worried about how professional my labels look. I’m kind of digging the homemade vibe they have right now.
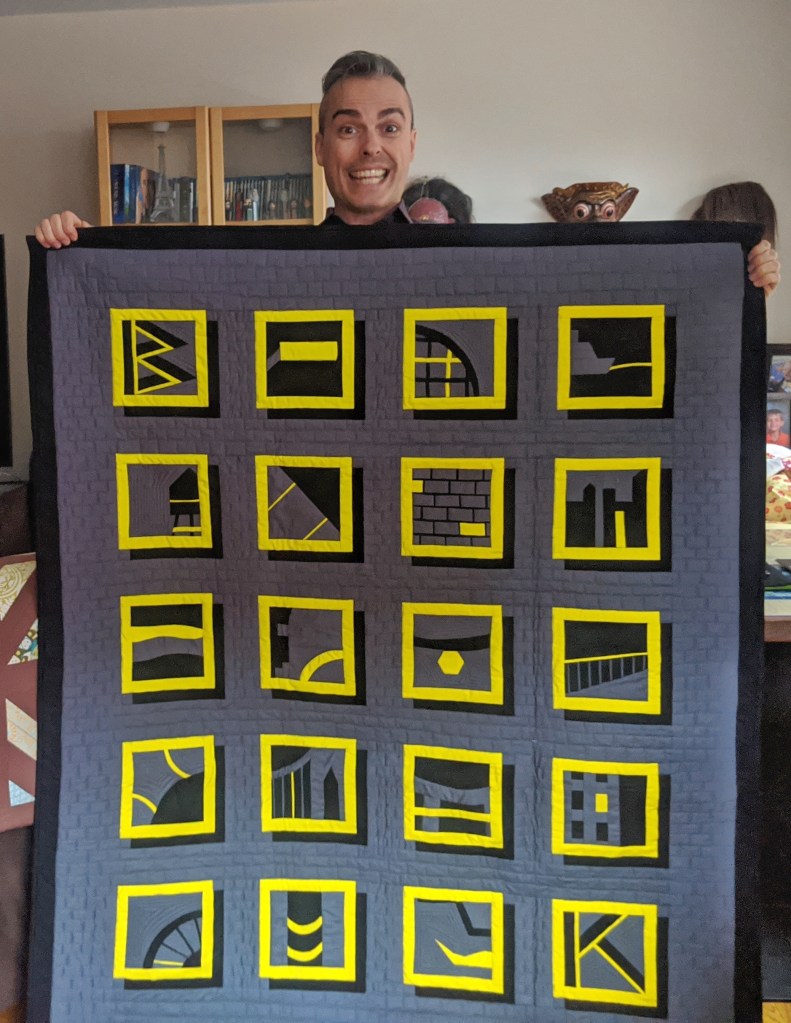
One thing you may remember from one of my earlier “Creating a Quilt” posts is that I was planning on calling this quilt “Dear Brooklyn,” as an homage to the Dear Jane quilt pattern. However, as I started actually making the quilt, I realized my quilt really looked nothing like a Dear Jane quilt and instead my blocks looked more like Polaroid snapshots. So one of the last design decisions I made was to change the name to “BK Snaps.”
And now my quilt is officially finished. Huzzah! I really loved the entire process of creating this quilt, and I’m so glad you came along on the journey with me. I’d love to hear about your own quilt-creating process or any sort of creative process you use whenever you’re crafting anything. Please leave comments or questions in the Comment section below, so we can all learn from each other and continue to thrive as a creating community! Happy crafting!!
My name is Andrew Ve Hansen, and welcome to my blog. I live in the Clinton Hill neighborhood of Brooklyn, New York, with my husband. I’m originally from Ohio, and I moved to Brooklyn when I was 22 years old to pursue a career in musical theater. While I no longer perform professionally, I still have a desire — a need — to express myself creatively which is where quilting comes in.
I made my first quilt in March of 2017. I can’t really pinpoint a singular moment or person that drew me to quilting. Family members, including my Great-grandma Bessie and my mom, are pretty crafty, so I definitely grew up with an appreciation of handmade gifts. In the lobby of the fine arts building of Otterbein University, where I went to college, there was a monthly rotating art exhibit. I clearly remember an exhibit by a fiber artist who had created many art quilts that I found stunning and powerful. I didn’t know the definition of a quilt could be so flexible. It is the only art exhibit during my time at Otterbein that I can actually remember, so it clearly made an impact on me. And anytime I’ve seen a handmade quilt in person, I’ve been captivated by it. So I guess this idea of making a quilt has just always been simmering in the back of my head.
A few years ago I thought it would be really cool to make a quilt for our bed, but I refused to try it while we still had a cat. I know, I know, there are tons of amazing quilters out there who have pets, and I love seeing all of those Instagram pics of how “helpful” those pets are during your making process. I, however, am not so patient. In March of 2017, our cat passed away. At the same time, my husband was in the process of opening a bar with some colleagues, which meant he was never home. All of that motivated me to find something to do with my time other than sit and watch Netflix or play video games every night.
By the way, in addition to being a quilter and a former musical theater performer, I’m also kind of a big geek. Hence the title of this particular blog post. I’m happy to discuss at length the Marvel Cinematic Universe, comic books, PS4 games — particularly Diablo III — board games, and the Pathfinder RPG. So feel free to reach out if you need a break from the quilting conversation.
Back to my quilting journey. I looked around online for some quilting resources and discovered Craftsy.com, which is now Bluprint. Because I already knew how to use my sewing machine, I didn’t need a super beginner course. I decided to take Amy Gibson’s Learn to Quilt: Cozy Throw Quilt class. It was a great way to learn the basics of quilting, and Amy Gibson was an incredible teacher. When it came time to actually sew all of the layers of the quilt together, I decided to use my walking foot for some straight-line quilting on my domestic machine, a Janome DC2012. But because I chose to do a lot of pivoting instead of unbroken straight lines from edge to edge, it involved so much physical effort turning the quilt around over and over again. I actually thought several times, “How do those retired grandmas do this all the time?? This is really exhausting!!” This was before I learned about free-motion quilting or sending a quilt out to a longarm professional.
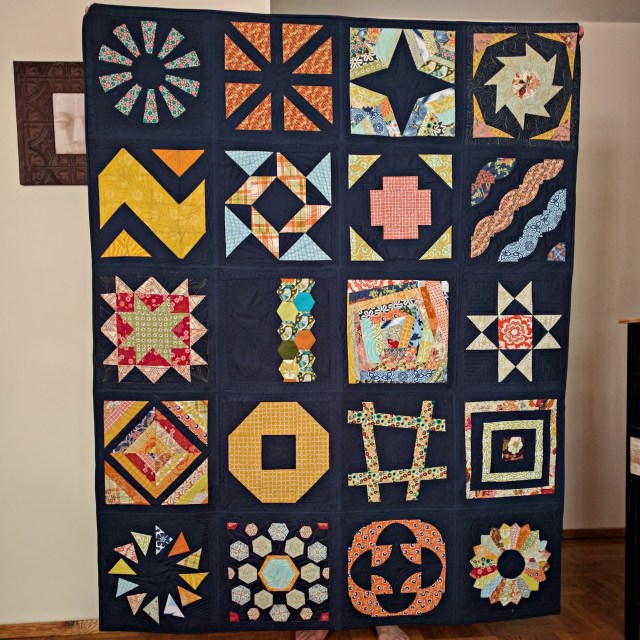
I finally finished quilting my quilt, and while I was very pleased with the result I honestly thought, “Well, that was too much work, so no more quilts for me.” But I couldn’t get quilting out of my brain. It was only a couple weeks later when I started thinking about making a new quilt. I decided to take another Craftsy class by Amy Gibson, which was her 2012 Block of the Month class. It was a sampler quilt, which meant I would learn tons of basic techniques all in one quilt. I also decided I would take advantage of this “learning” session to take Leah Day’s Free Motion Quilting a Sampler Craftsy class, which used Amy Gibson’s sampler quilt to learn how to free-motion quilt (FMQ). And since the blocks were all about 12 inches square, I decided it would be easier to learn how to FMQ block by block rather than on the whole quilt. So I decided to learn the quilt-as-you-go technique as well. AND, what the heck, I decided to use mitered borders for each block. Here’s what I learned from this second quilt.
I LOVE making quilts!
I REALLY, REALLY LOVE FMQ!!
I HATE mitered borders!!!
So that was how I got hooked. I continue making discoveries as I move along on this quilting journey. I definitely enjoy making a quilt completely my own from beginning to end more than using someone else’s pattern. I really enjoy improv piecing and I want to keep experimenting with that. Surprisingly, I actually enjoy every portion of the quilt-making process, even some of the more tedious aspects such as pressing all of the fabric before cutting or squaring up a bunch of half-square triangles or even pin basting. Most of all, I really love learning new techniques and trying to become a better craftsperson.
What’s your quilting origin story? What discoveries have you made along the way in your own quilting journey? Share your comments below and let’s continue this conversation together. Happy Quilting!!!